CxImage is a C++ class to manage almost any kind of images.
It can load, save, display, transform images in a very simple and fast way.
Why another image library? Around there are many good libraries (OpenIL, FreeImage, PaintLib ...), these are powerful, complete, and constantly updated. However if you ever try to use them, you may find some difficulties; because these libraries are mainly platform independent, written in C, sometimes with a basic C++ wrapper and with tons of compiler switch declarations. Now with the new GDI+ classes on the scene, maybe CxImage isn't so useful, but at least here you have the source code. It is not a MFC library, altogether it's a windows library, because of some particular constructors and the painting functions, but the backbone is platform independent.
In the vertical hierarchy of the library, CxImage stays on the
top of the other modules, it's not a clean OOP approach, but the result was good
since the first release and now it's too late to change again. Anyway you can
always use the derived classes to perform the format specific operations, like
for CxImageTIF to save multipage TIFFs.
The glue to connect all the modules and the C libraries is
CxFile, a virtual class that provides the standard methods to
access the data from a file on the disk or in memory.

A Cximage object is basically a bitmap, with the addition of
some member variables to store useful information:
 class CxImage
  {
  ...
  protected:
  void* pDib;            //contains the header, the palette, the pixels
  BITMAPINFOHEADER head; //standard header
  CXIMAGEINFO info;      //extended information
  BYTE* pSelection;      //selected region
  BYTE* pAlpha;          //alpha channel
  CxImage** pLayers;     //generic layers
  }
CxImage::head is the bitmap header and
CxImage::pDib is a normal bitmap (as you can see in the
implementation of CxImageBMP::Encode).
CxImage::info is a handy container of many information shared
between different formats, and for all the member functions.
typedef struct tagCxImageInfo {
    DWORD   dwEffWidth;       //DWORD aligned scan line width
    BYTE*   pImage;           //THE IMAGE BITS
    void*   pGhost;           //if this is a ghost, pGhost point to the body
    DWORD   dwType;           //original image format
    char    szLastError[256]; //debugging
    long    nProgress;        //monitor
    long    nEscape;          //escape
    long    nBkgndIndex;      //used for GIF, PNG, MNG
    RGBQUAD nBkgndColor;      //used for RGB transparency
    BYTE    nQuality;         //used for JPEG
    long    nFrame;           //used for TIF, GIF, MNG : actual frame
    long    nNumFrames;       //used for TIF, GIF, MNG : total number of frames
    DWORD   dwFrameDelay;     //used for GIF, MNG
    long    xDPI;             //horizontal resolution
    long    yDPI;             //vertical resolution
    RECT    rSelectionBox;    //bounding rectangle
    BYTE    nAlphaMax;        //max opacity (fade)
    bool    bAlphaPaletteEnabled;  //true if alpha values in the palette are
                              // enabled.
    bool    bEnabled;         //enables the painting functions
    long    xOffset;
    long    yOffset;
    DWORD   dwEncodeOption;   //for GIF, TIF : 0=def.1=unc,2=fax3,3=fax4,
                              // 4=pack,5=jpg
    RGBQUAD last_c;           //for GetNearestIndex optimization
    BYTE    last_c_index;
    bool    last_c_isvalid;
    long    nNumLayers;
    DWORD   dwFlags;
} CXIMAGEINFO;
|
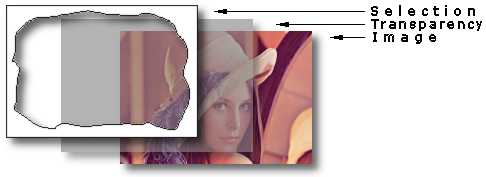
A CxImage object is also a set of layers. The buffers in each layer are allocated only when necessary.
|
 |
The whole library is quite big, in the configuration header file
ximacfg.h you'll find the switches to enable or disable a specific
graphic format or feature. Each JPG, PNG and TIFF library adds about 100KB to
the final application, while the CxImage impact is about 50KB. So
you should support and link only the formats that your application really
needs.
| formats | #define | required libraries | size [Kbyte] |
| BMP GIF ICO TGA PCX WBMP WMF |
CXIMAGE_SUPPORT_BMP CXIMAGE_SUPPORT_GIF CXIMAGE_SUPPORT_ICO CXIMAGE_SUPPORT_TGA CXIMAGE_SUPPORT_PCX CXIMAGE_SUPPORT_WBMP CXIMAGE_SUPPORT_WMF |
built in |
24 |
| JPEG | CXIMAGE_SUPPORT_JPG |
jpeg |
88 |
| PNG | CXIMAGE_SUPPORT_PNG |
png, zlib |
104 |
| MNG | CXIMAGE_SUPPORT_MNG |
mng, zlib, jpeg |
148 |
| TIFF | CXIMAGE_SUPPORT_TIF |
tiff, zlib, jpeg |
124 |
| JBIG | CXIMAGE_SUPPORT_JBG | jbig |
28 |
| PNM,PPM,PGM RAS |
CXIMAGE_SUPPORT_PNM CXIMAGE_SUPPORT_RAS |
jasper |
176 |
| JPEG-2000 |
CXIMAGE_SUPPORT_JP2 CXIMAGE_SUPPORT_JPC CXIMAGE_SUPPORT_PGX |
jasper |
176 |
| Option | #define | Size [Kbyte] |
| CxImage core | all switches off | 20 |
| geometric transformations | CXIMAGE_SUPPORT_TRANSFORMATION | 16 |
| image processing | CXIMAGE_SUPPORT_DSP | 24 |
| drawing and windows specific functions | CXIMAGE_SUPPORT_WINDOWS | 12 |
| transparency | CXIMAGE_SUPPORT_ALPHA | 4 |
| selections | CXIMAGE_SUPPORT_SELECTION | 4 |
| multiple layers | CXIMAGE_SUPPORT_LAYERS | < 4 |
| graphic formats conversion |
CXIMAGE_SUPPORT_DECODE CXIMAGE_SUPPORT_ENCODE |
< 4 |
|
The CxImgLib.dsw workspace shows the libraries required to build
an application (demo.exe) including almost all the features and the
formats available in CxImage. You must compile all the libraries before
you can link the final application.
Building the projects will need some minutes to complete (the intermediate files occupy 60MB!). When everything is done, select the demo project and launch the application. |
CxImgLib.dsw |
To use CxImage in your project, you must edit these settings:
Project Settings
 |- C/C++
 |   |- Code Generation
 |   |   |- Use run-time library : Multithreaded DLL (must be the same for
 |   |   |  all the linked libraries)
 |   |   |- Struct member alignment : must be the same for all the linked
 |   |   |  libraries
 |   |- Precompiled headers : not using precompiled headers
 |   |- Preprocessor
 |       |- Additional Include Directories:  ..\cximage
 |- Link
    |- General
        |- Object/library modules: ../png/Debug/png.lib
                                   ../jpeg/Debug/jpeg.lib
                                   ../zlib/Debug/zlib.lib
                                   ../tiff/Debug/tiff.lib
                                   ../jasper/Debug/jasper.lib
                                    ../cximage/Debug/cximage.lib  ...
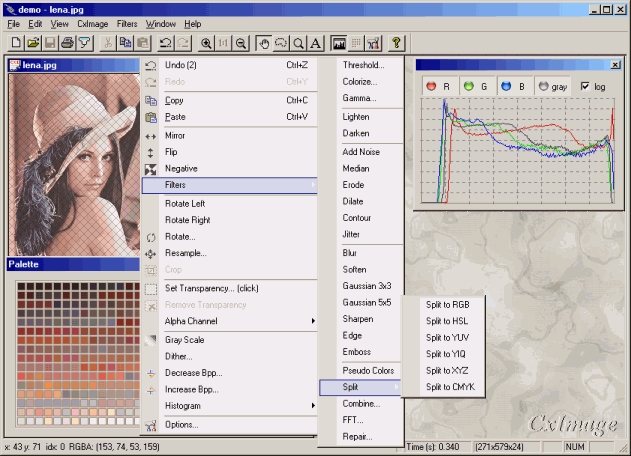
Writing a new function for image processing is not so hard with CxImage. Here
I'm going to describe CxImage::Jitter, it's very simple but it
shows many aspects to take care when you work inside CxImage. The first thing,
of course, is the declaration : bool Jitter(long radius=2); in the
CXIMAGE_SUPPORT_DSP section of ximage.h, you can declare the function everywhere
in the public scope of the class. And now the definition:
bool CxImage::Jitter(long radius)
{
    // check if the image is valid, this should be always the first line in
    // the function
    if (!pDib) return false;

    // local variables
    long nx,ny;

    // temporary image to store the partial results of the algorithm
    CxImage tmp(*this,pSelection!=0,true,true);

    // limit the effects of the functions only in the smallest rectangle that
    // holds the selected region (defined with the Selection...() functions ),
    // this will speed up the loops.
    long xmin,xmax,ymin,ymax;
    if (pSelection){
        xmin = info.rSelectionBox.left; xmax = info.rSelectionBox.right;
        ymin = info.rSelectionBox.bottom; ymax = info.rSelectionBox.top;
    } else {
        xmin = ymin = 0;
        xmax = head.biWidth; ymax=head.biHeight;
    }

    // main loop : scan the image in vertical direction
    for(long y=ymin; y <ymax; y++){

        // monitor the progress of the loops
        info.nProgress = (long)(100*y/head.biHeight);

        // let the application a way to exit quickly
        if (info.nEscape) break;

        // main loop : scan the image in horizontal direction
        for(long x=xmin; x<xmax; x++){

        // if the feature is enabled, process only the pixels inside the
        // selected region
#if CXIMAGE_SUPPORT_SELECTION
            if (SelectionIsInside(x,y))
#endif //CXIMAGE_SUPPORT_SELECTION
            {
                // main algorithm
                nx=x+(long)((rand()/(float)RAND_MAX - 0.5)*(radius*2));
                ny=y+(long)((rand()/(float)RAND_MAX - 0.5)*(radius*2));
                if (!IsInside(nx,ny)) {
                    nx=x;
                    ny=y;
                }

                // save the result in the temporary image.
                // if you can, use PixelColor only for 24 bpp images,
                // and PixelIndex for 8, 4 and 1 bpp images : it's faster
                if (head.biClrUsed==0){
                    tmp.SetPixelColor(x,y,GetPixelColor(nx,ny));
                } else {
                    tmp.SetPixelIndex(x,y,GetPixelIndex(nx,ny));
                }

                // if the feature is enabled, process also the pixels
                // in the alpha layer
#if CXIMAGE_SUPPORT_ALPHA
                tmp.AlphaSet(x,y,AlphaGet(nx,ny));
#endif //CXIMAGE_SUPPORT_ALPHA
            }
        }
    }

    // save the result and exit
    Transfer(tmp);
    return true;
}
CxImage  image;
// bmp -> jpg
image.Load("image.bmp", CXIMAGE_FORMAT_BMP);
if (image.IsValid()){
    if(!image.IsGrayScale()) image.IncreaseBpp(24);
    image.SetJpegQuality(99);
    image.Save("image.jpg",CXIMAGE_FORMAT_JPG);
}
// png -> tif
image.Load("image.png", CXIMAGE_FORMAT_PNG);
if (image.IsValid()){
    image.Save("image.tif",CXIMAGE_FORMAT_TIF);
}
//Load the resource IDR_PNG1 from the PNG resource type
CxImage* newImage = new CxImage();
newImage->LoadResource(FindResource(NULL,MAKEINTRESOURCE(IDR_PNG1),
"PNG"),CXIMAGE_FORMAT_PNG);or//Load the resource IDR_JPG1 from DLL
CxImage* newImage = new CxImage();
HINSTANCE hdll=LoadLibrary("imagelib.dll");
if (hdll){
HRSRC hres=FindResource(hdll,MAKEINTRESOURCE(IDR_JPG1),"JPG");
newImage->LoadResource(hres,CXIMAGE_FORMAT_JPG,hdll);
FreeLibrary(hdll);
}or//Load a bitmap resource;
HBITMAP bitmap = ::LoadBitmap(AfxGetInstanceHandle(),
MAKEINTRESOURCE(IDB_BITMAP1)));
CxImage *newImage = new CxImage();
newImage->CreateFromHBITMAP(bitmap);
CxImage image((BYTE*)buffer,size,image_type);or
CxMemFile memfile((BYTE*)buffer,size);
CxImage image(&memfile,image_type);
or
CxMemFile memfile((BYTE*)buffer,size);
CxImage* image = new CxImage();
image->Decode(&memfile,type);
long size=0;
BYTE* buffer=0;
image.Encode(buffer,size,image_type);
...
free(buffer);
or
CxMemFile memfile;
memfile.Open();
image.Encode(&memfile,image_type);
BYTE* buffer = memfile.GetBuffer();
long size = memfile.Size();
...
free(buffer);
CxImage *pimage[3];
pimage[0]=&image1;
pimage[1]=&image2;
pimage[2]=&image3;

FILE* hFile;
hFile = fopen("multipage.tif","w+b");

CxImageTIF multiimage;
multiimage.Encode(hFile,pimage,3);

fclose(hFile);orFILE* hFile;
hFile = fopen("c:\\multi.tif","w+b");
CxImageTIF image;
image.Load("c:\\1.tif",CXIMAGE_FORMAT_TIF);
image.Encode(hFile,true);
image.Load("c:\\2.bmp",CXIMAGE_FORMAT_BMP);
image.Encode(hFile,true);
image.Load("c:\\3.png",CXIMAGE_FORMAT_PNG);
image.Encode(hFile);
fclose(hFile);
//copy
HANDLE hDIB = image->CopyToHandle();
if (::OpenClipboard(AfxGetApp()->m_pMainWnd->GetSafeHwnd())) {
    if(::EmptyClipboard()) {
        if (::SetClipboardData(CF_DIB,hDIB) == NULL ) {
            AfxMessageBox( "Unable to set Clipboard data" );
}    }    }
CloseClipboard();

//paste
HANDLE hBitmap=NULL;
CxImage *newima = new CxImage();
if (OpenClipboard()) hBitmap=GetClipboardData(CF_DIB);
if (hBitmap) newima->CreateFromHANDLE(hBitmap);
CloseClipboard();
HBITMAP m_bitmap = NULL;
CxImage image("myfile.png", CXIMAGE_FORMAT_PNG);
...
if (m_bitmap) DeleteObject(m_bitmap);
m_bitmap = image.MakeBitmap(m_picture.GetDC()->m_hDC);
m_picture.SetBitmap(m_bitmap);
Starting form my CxDib class, that implements memory DIBs only,
I tried to add some members to read images from files. Looking for a solution,
I found a nice MFC class named CImage on the net, release 1.4 (1998).
CImage supports BMP, GIF, PNG and JPG, but suffers many little
bugs and uses a complex class structure, so I decided to strip it to the base
and merge CxDib with the CImage philosophy, to obtain
the new CxImage class. Also I updated the libraries for JPG, PNG
and ZLIB.
With CxImage is very easy to add new image types, so I added the
TIFF library (rev. 6) and a minimal support for ICONs, MNG, TGA
and PCX. Finally I added some specific functions to obtain an image from global
HANDLEs (windows clipboard) and objects (windows resources).
With the release 5, CxImage has now a good support for memory files, new methods
and file formats, and it is more portable.
CTwain code; to Abe for multi
page tiffs code; to Chris Shearer Cooper for memory file suggestions and code;
to Brent Corkum for BCMenu code. More specific credits and disclaimers are in every header file of each library.